The scheduler pulls new and updated Salesforce records into Jira on a five-minute cadence.
Documentation validated against bridge build on April 14, 2026
Technical deployment guide for the Salesforce Bridge for Jira
This guide covers Marketplace installation, Salesforce OAuth client credentials setup, Smart Connected Items, five-minute scheduled reconciliation, Jira push events, and the linked-record workflow inside the Jira issue panel.
Marketplace app
Forge app
Jira admin page
Jira issue panel
Salesforce REST API
Issue, comment, and attachment events push eligible Jira changes back to Salesforce.
Files above 10 MB are skipped so sync stays within Forge runtime and payload limits.
Common standard objects are curated and custom objects are discovered from Salesforce describe metadata.
Fast Path
Quick start in seven steps
Install the app
A Jira site admin installs the Salesforce Bridge for Jira and opens the app from Jira administration.
Use the right Salesforce org
For predictable setup, use a Salesforce Developer Edition org or another org that exposes External Client Apps and API access.
Create a dedicated integration user
Choose the Salesforce user that the app will run as. That user needs API access plus read and update rights on the objects you plan to sync.
Create the External Client App
Create a Salesforce External Client App for the OAuth 2.0 client credentials flow, enable Client Credentials Flow, and assign the Run As user.
Copy the Login URL, Client ID, and Client Secret
Use a Salesforce login URL that matches your org policy, then paste the Client ID and Client Secret into the Jira admin page.
Create Smart Connected Items
Choose display-only, one-way sync, or two-way sync behavior, then configure Jira scope, Salesforce object, field mappings, and optional sync features.
Link or auto-create records
Jira users can manually link Salesforce records from the issue panel, and synchronized Smart Connected Items can optionally auto-create Jira issues from new Salesforce records.
Architecture
How the bridge works
Current sync model in this build
The scheduled trigger runs every five minutes. It can create Jira issues for new Salesforce records when auto-create is enabled, and it applies Salesforce-to-Jira updates for mapped fields, status, comments, and attachments on linked records.
Jira-to-Salesforce updates are event-driven. Jira issue updates push field and status changes, Jira comment events push Jira comments, and Jira attachment events push new Jira files to Salesforce without waiting for the next scheduled run.
Where configuration and state live
- Salesforce connection settings are stored in Forge app storage.
- The OAuth client secret is stored in Forge secret storage.
- OAuth access tokens are requested dynamically and cached for the current invocation.
- Smart Connected Item definitions and issue-to-record links are stored in Forge app storage.
- Comment and attachment pairing state is stored per linked issue and record pair.
- Production usage is license-gated, while development installs can still be tested.
How Jira users see the integration
- The issue panel shows one card per Smart Connected Item that applies to the Jira project.
- Display-only items wait for a manual link before showing selected Salesforce fields.
- Synchronized items can be manually linked or auto-managed by the scheduler.
- Linked records can expose field previews, a direct Salesforce link, refresh, and unlink actions.
- Auto-managed links stay read-only in the issue panel but can still be refreshed.
Object Catalog
Supported Salesforce objects in this bridge
| Module / object group | Objects in the current curated catalog | Typical use | Notes |
|---|---|---|---|
| Salesforce Service Cloud | Case |
Service, support, and incident-style workflows | Best fit for full sync, comments, attachments, and status behavior. |
| Salesforce CRM | Account, Contact, Lead, Opportunity |
CRM visibility, manual links, and object-specific field previews | Leads and Opportunities can also participate in synchronized flows when the selected mappings make sense. |
| Salesforce Activities | Task, Event |
Activity-oriented records that Jira teams need to reference or sync | Status-like behavior depends on the chosen Salesforce field such as Status or ShowAs. |
| Salesforce Revenue | Quote, Order, Contract |
Commercial and downstream operational tracking | Useful when Jira teams need visibility or controlled one-way / two-way synchronization on revenue records. |
| Custom objects | Live custom object catalog returned by Salesforce describe metadata | Org-specific data models | Custom objects are surfaced dynamically so the admin can work against the connected org instead of a hardcoded list. |
Field pickers are live
The admin field selectors are built from live Salesforce describe metadata. Generic field
labels such as Name are expanded when needed so admins can read options like
Account Name more clearly in the picker.
Terminology
Key terms used by this bridge
Smart Connected Item
A saved bridge configuration that defines the Jira scope, Salesforce object, selected fields, mappings, and sync behavior.
Display-only Item
A manual-link-only item that displays selected Salesforce fields in the Jira issue panel without turning on synchronization.
Connected Project
The synchronized form of a Smart Connected Item. It targets one Jira project and one Jira issue type, and it can auto-create Jira issues from Salesforce records.
Auto-managed Link
A record link created by the five-minute scheduler. It is intentionally read-only in the issue panel so users do not break the scheduler-owned relationship by hand.
Integration User
The Salesforce user selected as the Run As user in the External Client App. The bridge performs API operations with that user's access.
Refresh
A manual issue-panel action that immediately pulls the latest Salesforce fields, comments, and attachments into Jira for the linked record.
Atlassian Marketplace
Install from Atlassian Marketplace
Who installs the app
A Jira site admin installs the Salesforce Bridge for Jira and then opens the app from Jira admin settings > Apps.
- Install the published Marketplace listing into the target Jira Cloud site.
- Open the app from the left-side apps list in Jira administration.
- Confirm the app is connected before you create any Smart Connected Items.
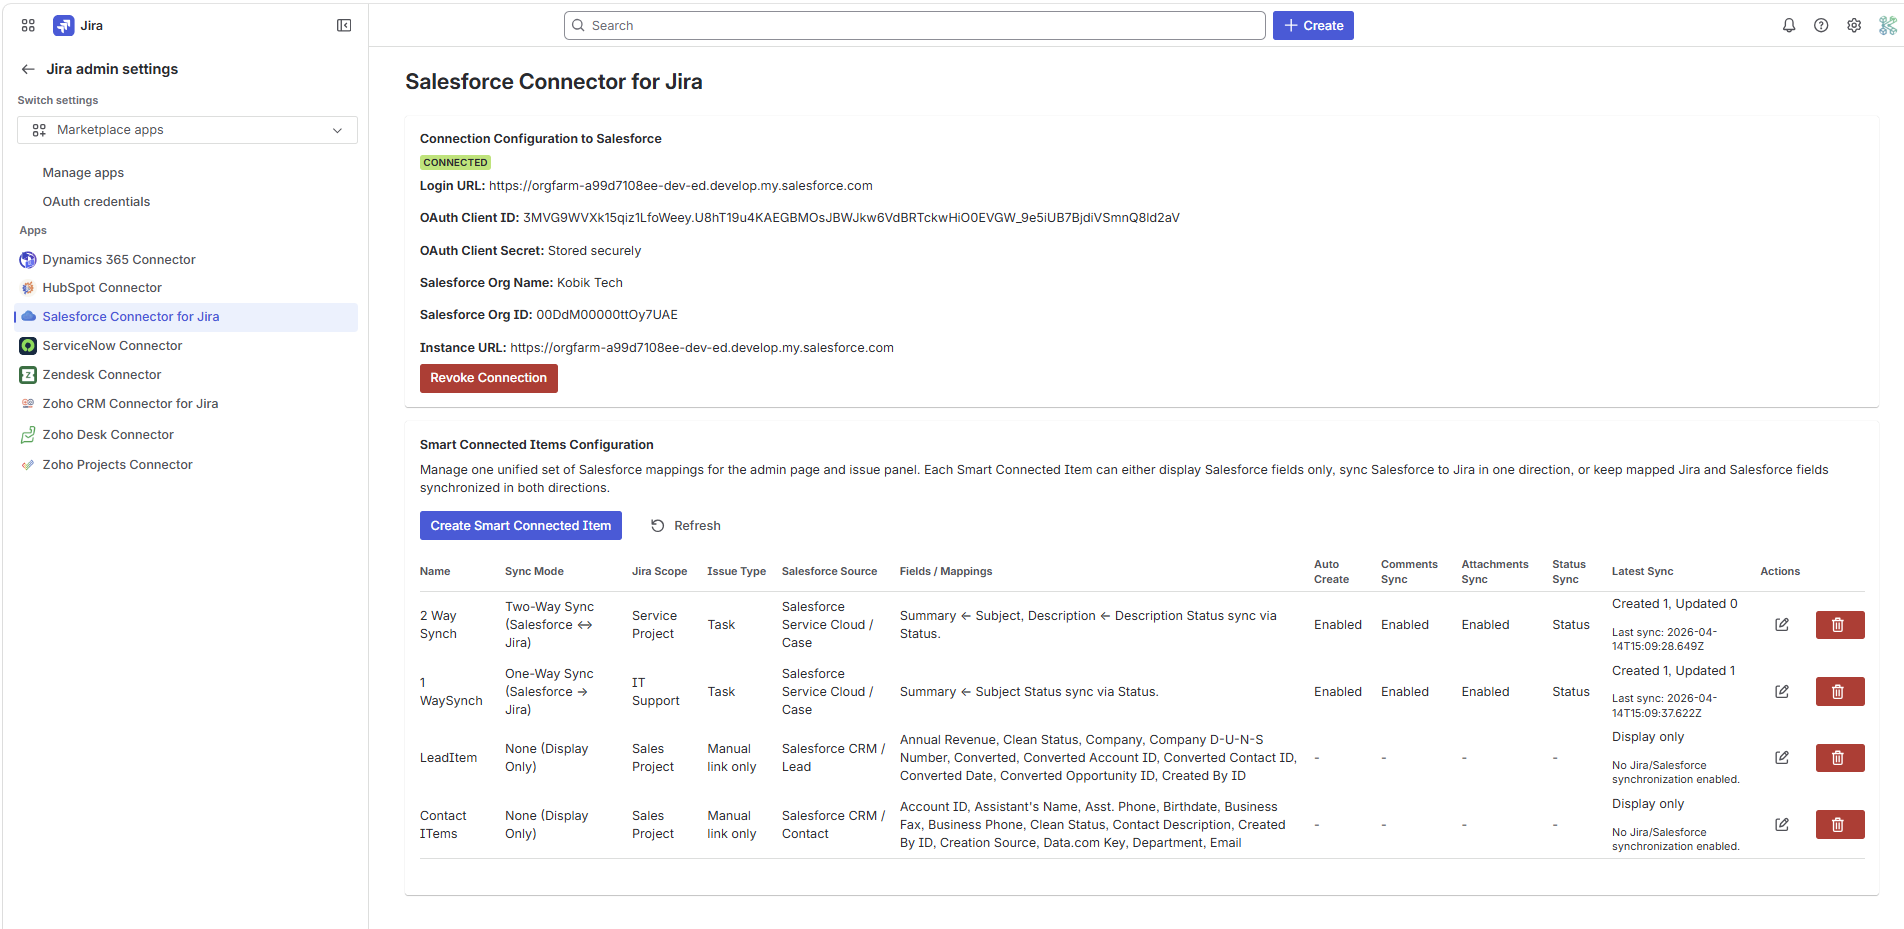
What the admin page becomes
Once installed, the Jira admin page becomes the operating surface for the Salesforce connection, the Smart Connected Items table, and the latest sync state for each synchronized row.
- Connection summary: Login URL, Client ID, Org Name, Org ID, Instance URL.
- Smart Connected Items dashboard: mode, Jira scope, Salesforce source, mappings, and latest sync.
- Row actions: edit, delete, and manual refresh of the configuration list.
Salesforce Org Prep
Get a Salesforce org that supports the setup flow
If the New External Client App button shows Page not found
That usually points to org edition, feature availability, or Salesforce admin permission limits rather than a Jira-side problem. For testing, use a Salesforce Developer Edition or another org where External Client Apps are available.
Recommended org type
Use a Salesforce Developer Edition org for product validation, screenshots, and repeatable API testing. It is the cleanest environment for bridge setup.
Required Salesforce admin capability
You need access to Setup plus permission to manage apps, integration users, and object security for the records the bridge will read or update.
Integration user recommendation
Use a dedicated Salesforce user for the bridge instead of a personal admin account. That keeps audit trails and permissions predictable.
Login URL options
The Jira app accepts https://login.salesforce.com,
https://test.salesforce.com, or a My Domain URL such as
https://your-org.my.salesforce.com.
No callback URL is required
This bridge uses the OAuth 2.0 client credentials flow. Because the app is not doing a browser redirect authorization step, you do not need to configure a callback URL for this integration.
Salesforce Setup
Create the Salesforce External Client App step by step
Authentication model used by this app
The Salesforce Bridge for Jira uses Salesforce OAuth 2.0 client credentials. In current Salesforce orgs this is normally handled by an External Client App. If your org still uses the older Connected App model for server-to-server integrations, the same Jira fields can work there too: Login URL, Client ID, and Client Secret.
Open Setup
Sign in to Salesforce as an administrator, click the gear icon, and open Setup.
Open App Manager
In Setup, search for App Manager. From there, click New External Client App. If your org exposes the dedicated External Client Apps area instead, you can also navigate through Apps > External Client Apps > External Client App Manager.
Create the app record
Enter a clear name such as Jira_Salesforce_Bridge, add the contact email, keep the app private to the org unless you have a stronger reason, and save the app.
Create or confirm the integration user
Decide which Salesforce user the bridge should act as. That user should have API access and the exact object, field, comment, and file permissions needed for the records you want Jira to link or sync.
Open the Policies tab
In the External Client App manager, open the created app and then open the Policies tab. This is where the client credentials flow is enabled.
Enable Client Credentials Flow
In the OAuth area, enable Client Credentials Flow and set the Run As user to the integration user you prepared.
Keep scopes minimal
Authorize only the Salesforce API scope the bridge needs:
Manage user data via APIs (api). Do not add unrelated OAuth scopes.
Copy the Client ID and Client Secret
Save the app, reveal the generated credentials, then copy the Client ID and Client Secret. You will paste them into the Jira admin page.
Recommended Salesforce-side access for the Run As user
- API Enabled on the user profile or permission set.
- Read access to object metadata so the bridge can load field catalogs.
- Read and update access on the Salesforce objects you plan to synchronize.
- Comment and feed access for
CaseComment,FeedItem, andFeedCommentwhere applicable. - File access for
ContentVersion,ContentDocument, andContentDocumentLink.
Values you will enter into Jira
- Salesforce Login URL: login, test, or your My Domain base URL.
- OAuth Client ID: the value generated by the External Client App.
- OAuth Client Secret: the matching secret for that client.
The Jira admin page validates the credentials immediately by requesting a Salesforce access token and confirming the connected org and instance URL.
Minimal OAuth scope for this bridge
Manage user data via APIs (api)Common setup mistakes that cause validation errors
- No client credentials user enabled: Client Credentials Flow is not enabled or no Run As user is selected.
- Too many scopes requested: the app is configured with extra OAuth scopes beyond the minimal API scope.
- Scope parameter not supported: some orgs reject the optional scope parameter unless the External Client App itself is already configured with the minimal API scope.
Jira Admin
Authenticate in the Jira admin page
Connection form fields
- Salesforce Login URL: for example
https://login.salesforce.comor your My Domain URL. - OAuth Client ID: copied from Salesforce.
- OAuth Client Secret: copied from Salesforce.
Connected-state summary
- Connected status lozenge.
- Stored Login URL and OAuth Client ID.
- Salesforce Org Name and Org ID returned by validation.
- Salesforce Instance URL resolved from the token response.
- Revoke Connection button to clear the saved configuration.
Use the same login URL family everywhere
If you choose a My Domain URL in Jira, keep using that same Salesforce hostname for your admin testing and direct record links. That reduces confusion when multiple Salesforce domains are in use.
Core Configuration
Create Smart Connected Items
Smart Connected Items are the core configuration unit for the Salesforce Bridge for Jira. The admin table mixes display-only items and synchronized items in one operational view so admins can review the Jira scope, Salesforce source, enabled sync features, and latest run status in one place.
| Column | Purpose |
|---|---|
| Name | The admin-facing Smart Connected Item name. |
| Sync Mode | Display-only, one-way sync, or two-way sync. |
| Jira Scope | One or more Jira projects for display-only items, or one project for synchronized items. |
| Issue Type | The Jira issue type used for synchronized items. Display-only items stay manual link only. |
| Salesforce Source | The selected module / object group and object. |
| Fields / Mappings | Selected preview fields or Jira-to-Salesforce mapping summary. |
| Auto Create / Comments / Attachments / Status | Enabled or off indicators for the current row. |
| Latest Sync | Display-only state, waiting state, counts from the last run, or attention required. |
Display-only Mode
Use display-only items when Jira users only need record visibility
When display-only is the right fit
- You want users to manually link a Salesforce record from the issue panel.
- You only need a readable preview of selected Salesforce fields.
- You want to reuse the same object preview across multiple Jira projects.
- You do not want the scheduler or Jira events to modify either side.
How the admin flow works
- Enter a display name.
- Select one or more Jira projects.
- Select the Salesforce module / object group and object.
- Select the Salesforce fields to show in the issue panel after linking.
Preview fields are object-aware
The field picker reads live metadata from the selected Salesforce object. That keeps the preview list accurate for objects like Account, Contact, Lead, Case, and custom objects.
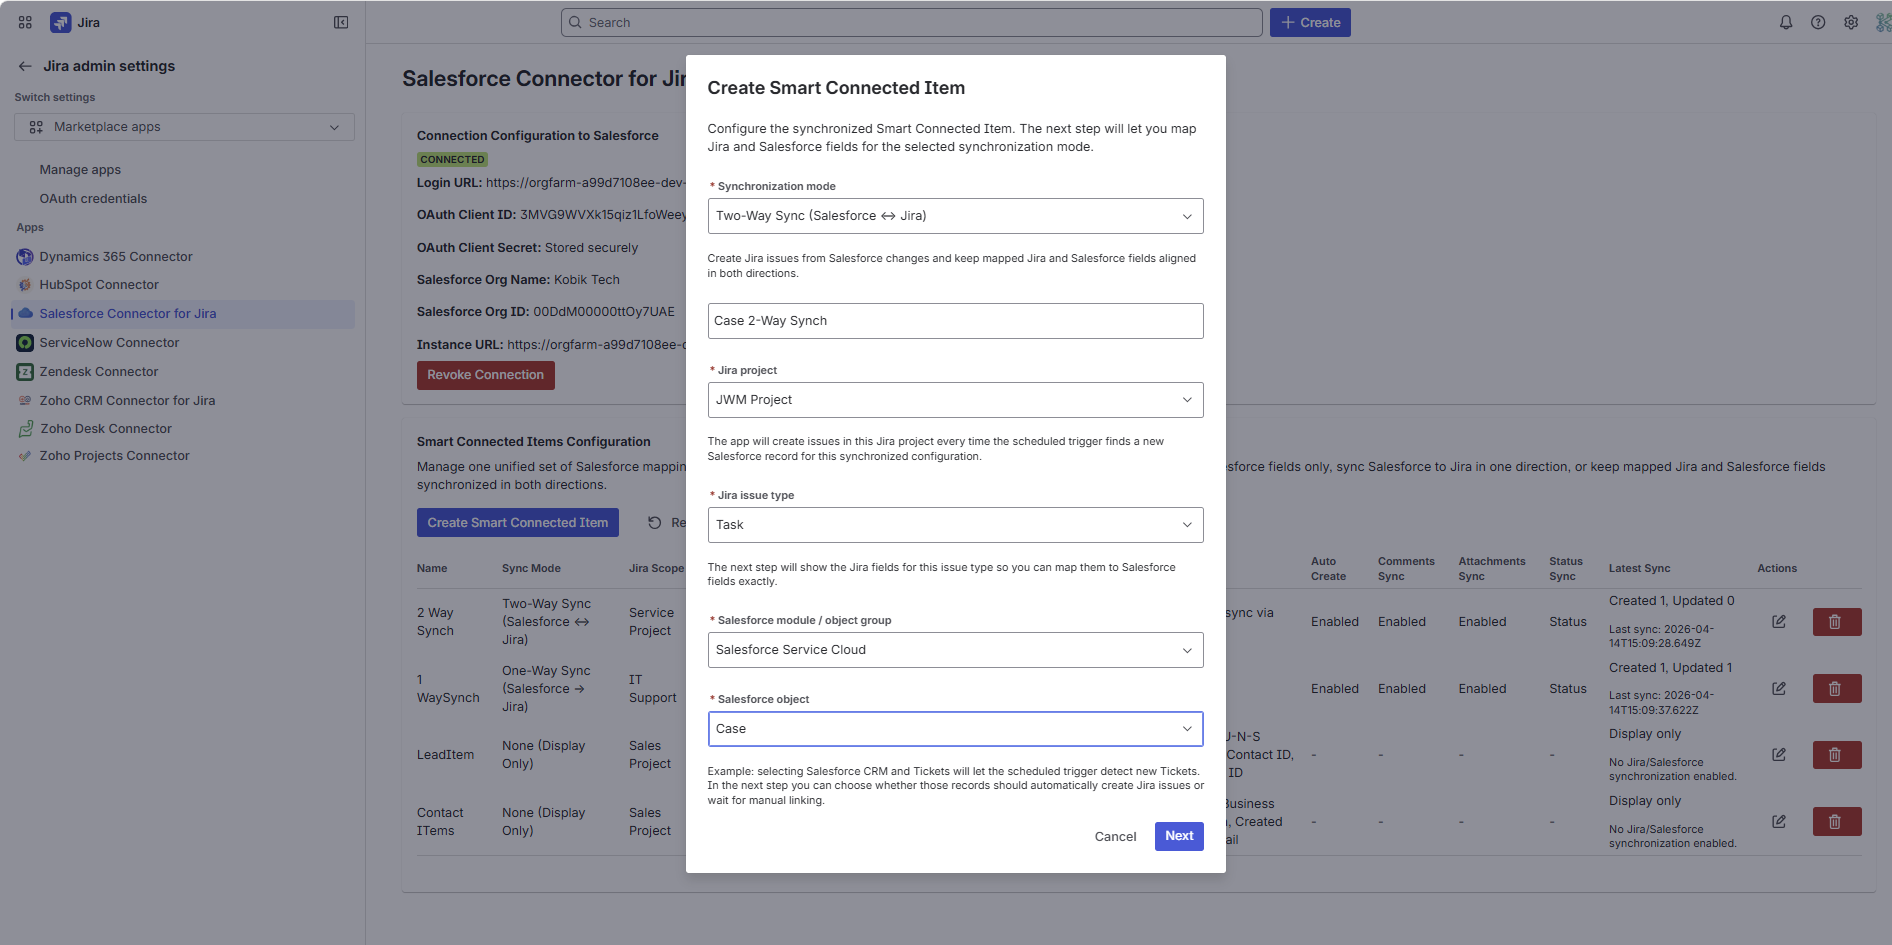
Synchronized Items
Create one-way and two-way Smart Connected Items

One-Way Sync (Salesforce -> Jira)
- Salesforce is the source of truth for mapped field values.
- The scheduler applies Salesforce changes to Jira every five minutes.
- Optional auto-create can open Jira issues from new Salesforce records.
- Comment, attachment, and status sync can still be enabled where appropriate.
Two-Way Sync (Salesforce <-> Jira)
- The scheduler still pulls Salesforce changes into Jira.
- Jira issue update events can push mapped field changes back to Salesforce.
- Jira comment and attachment events can also push to Salesforce when enabled.
- This mode is best when Jira teams actively work the issue and Salesforce must stay aligned.
Auto-create requires a workable Jira issue type
If the selected Jira issue type requires fields that the bridge cannot map safely, the admin page shows warnings before save. Add the required mappings or choose an issue type with a compatible required-field set.
Status sync is intentionally independent from field direction
After the first successful link, status sync compares Jira and Salesforce timestamps and lets the most recent side win, even when field mappings are configured as one-way. First sync initializes from Salesforce so a brand-new Jira issue does not immediately overwrite the Salesforce status.
Behavior Matrix
What each sync option does
| Option | What it controls | Current behavior |
|---|---|---|
| Auto-create in Jira | Whether the scheduler opens new Jira issues for matching Salesforce records | Runs every five minutes for synchronized items and stores the created link as auto-managed. |
| Field mappings | Which Salesforce fields populate Jira fields and, in two-way mode, which Jira fields can push back | Uses the live Jira field list for the selected issue type and live Salesforce field metadata for the selected object. |
| Status sync | How Jira workflow status aligns with a selected Salesforce status-like field | Uses closest safe match logic instead of requiring identical workflows. First link initializes from Salesforce. |
| Comments sync | Whether Salesforce comments and feed notes mirror into Jira and Jira comments push back | Cases use CaseComment plus case feed replies. Other feed-capable records use FeedItem and FeedComment. |
| Attachments sync | Whether unmatched files are reconciled between Jira and Salesforce | Uses ContentVersion, ContentDocument, and ContentDocumentLink. Manual link and Refresh also reconcile attachments immediately. |
Permissions
Permissions and access reference
Forge-side access used by the app
storage:appread:jira-workwrite:jira-workread:jira-userread:issue:jirawrite:issue:jira
Salesforce-side access the Run As user needs
- API access.
- Read access to Salesforce describe metadata for target objects.
- Read and update access on the objects selected in Smart Connected Items.
- Access to comment and feed objects used by the selected record type.
- Access to Salesforce Files APIs for attachment synchronization.
External network egress stays Salesforce-scoped
The app egress configuration is limited to Salesforce login and instance domains such as
login.salesforce.com, test.salesforce.com,
*.salesforce.com, *.my.salesforce.com, and
*.force.com.
Jira User Guide
Use the Jira issue panel
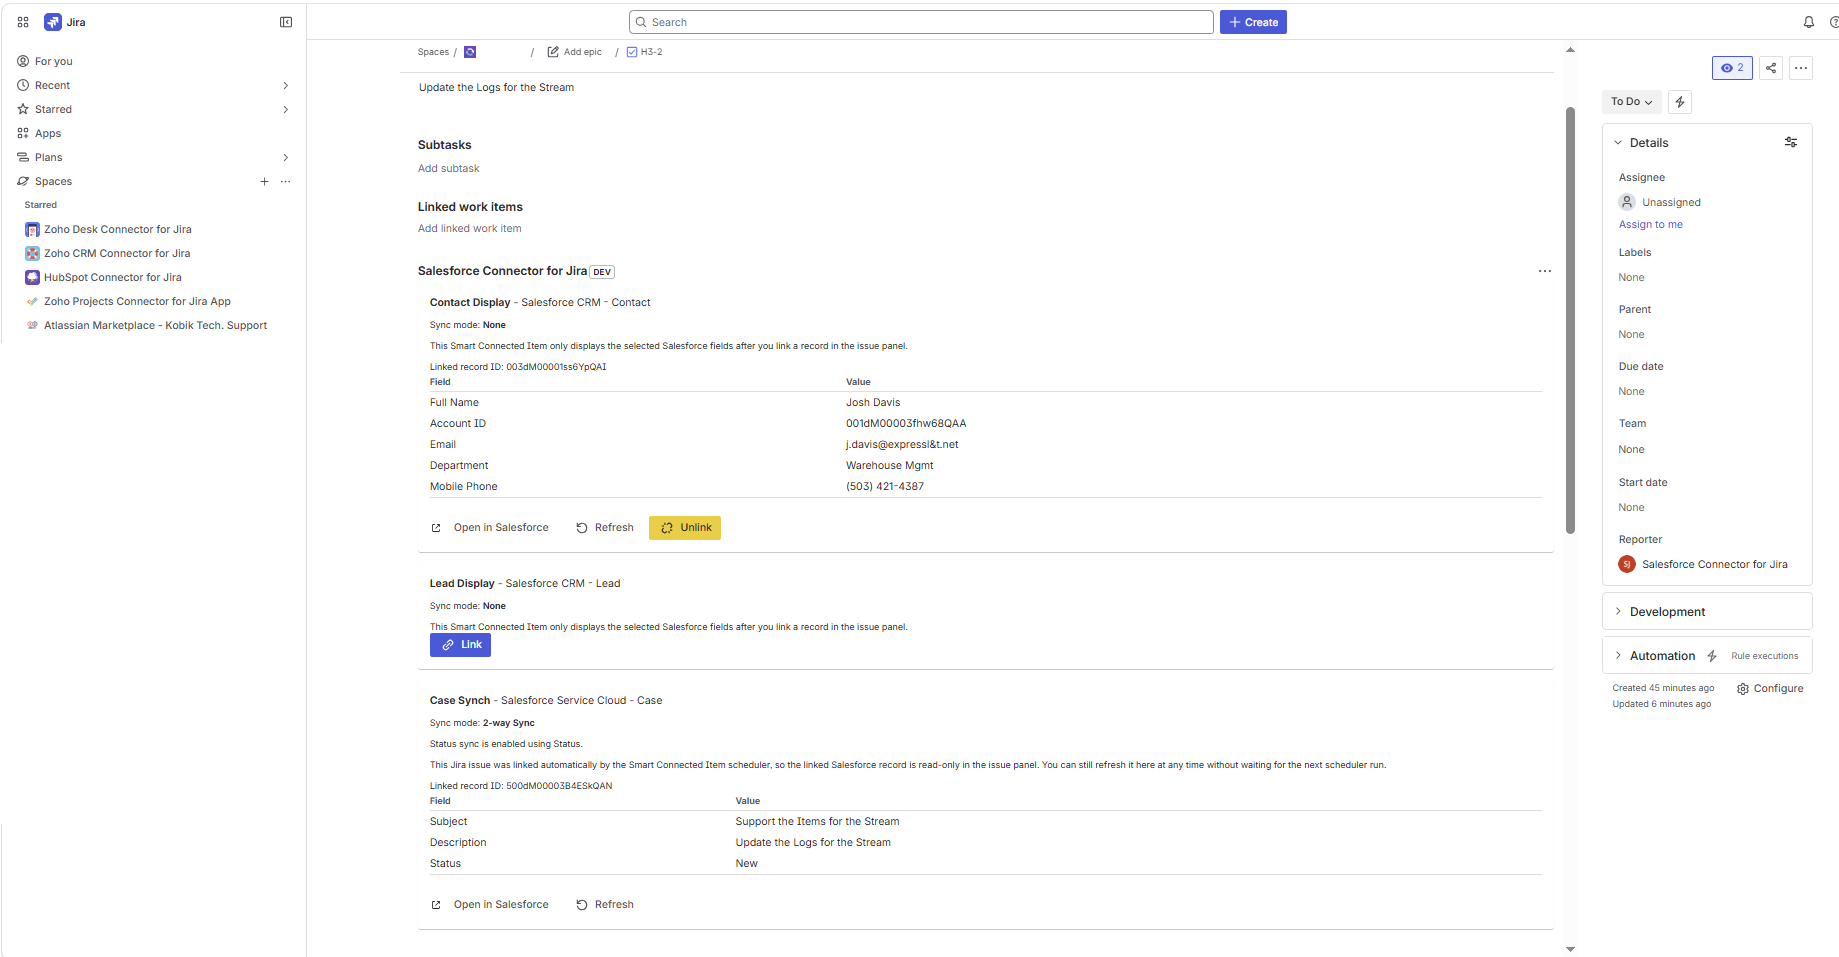
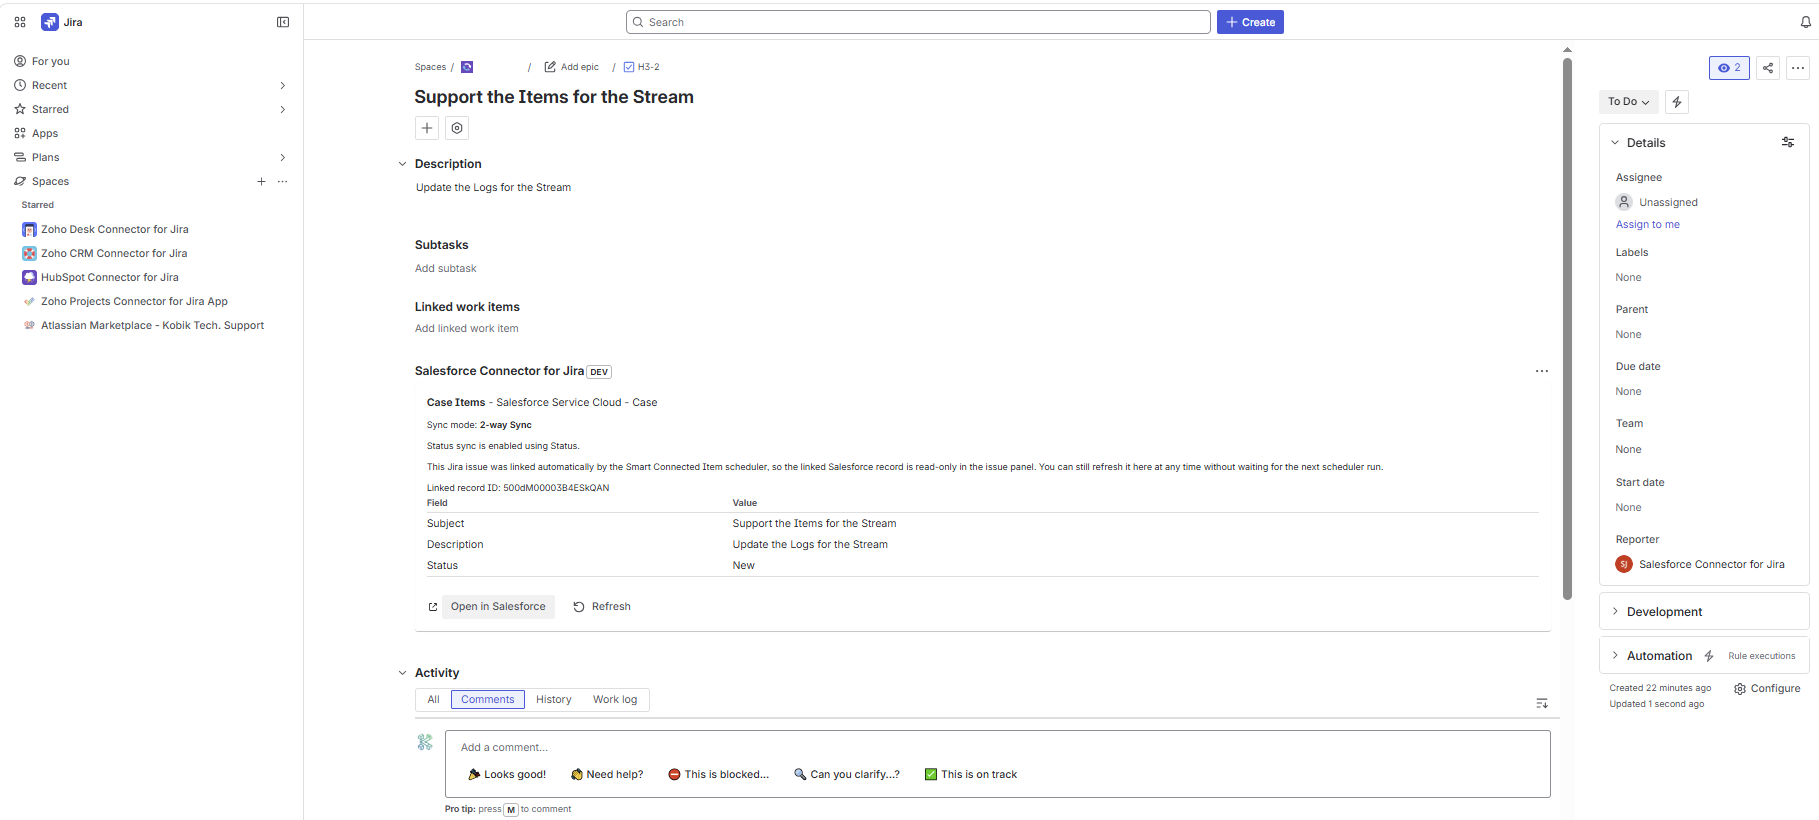
What each card shows
- The Smart Connected Item name plus the Salesforce module and object label.
- The current sync mode and status-sync context where applicable.
- The linked Salesforce record ID.
- A preview table containing the selected or mapped Salesforce fields.
- Open in Salesforce and Refresh actions.
- Unlink only for manual links.
Record preview formatting
- Lookup search results adapt to the selected object's important fields.
- Cases typically display like
00001026 [Kobik Tech Sample Case Test]. - Other objects use the best identifier and descriptive fields available, such as
Name [Email]orContractNumber [Status]. - The issue panel preview itself uses the field names the admin selected in the configuration.
Manual Operations
Link, Refresh, and Unlink
Link a record
The modal title is Link a Salesforce record. Users can start typing to search Salesforce records or paste a direct 15- or 18-character Salesforce record ID.
Search behavior
Free-text search uses object-specific search fields such as Case Number, Subject, Name, Company, Email, Phone, or Website depending on the selected Salesforce object.
Refresh
Refresh forces the bridge to immediately pull the latest Salesforce fields, comments, and attachments into Jira instead of waiting for the next scheduled run.
Unlink
Only manual links can be unlinked in the issue panel. Auto-managed links remain protected so the scheduler continues to own the relationship safely.
Scheduler-owned Relationships
How auto-managed links behave
When links become auto-managed
- The five-minute scheduler finds a new Salesforce record that matches a synchronized item.
- Auto-create in Jira is enabled for that Smart Connected Item.
- The bridge creates the Jira issue and stores the link as scheduler-owned.
What Jira users can still do
- Open the linked Salesforce record.
- Refresh the record immediately.
- Read the mapped Salesforce preview fields.
- Work the Jira issue normally so mapped Jira changes can still flow back when enabled.
Why the panel stays read-only for auto-managed links
The scheduler uses the stored relationship to track comments, attachments, status state, and field sync history. Letting a user manually replace or remove that link would make the sync state ambiguous, so the bridge keeps the relationship protected in the issue panel.
Salesforce Effects
What changes in Salesforce after linking
Mapped fields
- In one-way sync, Salesforce remains the source of truth for mapped field values.
- In two-way sync, Jira issue update events can push mapped field changes back to the linked Salesforce record.
- The admin controls exactly which fields participate in synchronization.
Status behavior
- Status sync uses the chosen Salesforce status-like field and Jira workflow status.
- The bridge looks for the closest safe alternative instead of requiring identical workflows.
- For Cases, Jira-to-Salesforce close handling uses the supported incident close behavior instead of faking an unsafe generic patch.
Comments and feed replies
- Cases use
CaseCommentfor top-level comments. - Case feed replies are also read from
FeedItemandFeedComment. - Other feed-capable records use
FeedItemfor top-level notes andFeedCommentfor replies. - Reply threads are flattened into Jira comments because Jira comments do not preserve Salesforce feed threading one-to-one.
Attachments
- Salesforce Files are synchronized through
ContentVersion,ContentDocument, andContentDocumentLink. - Scheduled sync and manual refresh can pull Salesforce files into Jira.
- New Jira attachments are uploaded to Salesforce quickly through Jira attachment events.
- Existing paired files are not duplicated. Deletions are not mirrored automatically.
Traceability
Bridge-managed markers and notes
| Marker | Where it appears | Purpose |
|---|---|---|
| Salesforce Jira link note | Salesforce comment / note surface for the linked record | Stores the Jira issue key, URL, Smart Connected Item name, and whether the link is manual or automatic. |
[Salesforce Bridge for Jira] Jira attachment sync note |
Salesforce comment / note surface for Jira-origin attachments | Prevents duplicate file sync and records the Jira attachment ID plus the synced filename. |
[Salesforce Bridge for Jira] Attachment sync comment |
Jira issue comment timeline | Makes it clear when a synced attachment originated in Jira or in Salesforce. |
| Flattened reply sync note | Jira comments or Salesforce notes depending on direction | Preserves the parent-comment context when Salesforce feed replies are flattened during sync. |
Operations
Troubleshooting
The Jira admin page rejects the Salesforce credentials
Recheck the Login URL, Client ID, and Client Secret first. Then confirm the External Client App is configured for Client Credentials Flow and has a valid Run As user with API access.
- No client credentials user enabled: enable Client Credentials Flow and choose a Run As user.
- Too many scopes requested: keep only the minimal API scope the bridge needs.
- Scope parameter not supported: configure the app itself with the minimal API scope and retry.
Clicking New External Client App shows Page not found in Salesforce
Use a Salesforce Developer Edition org or another org where External Client Apps are available. Also confirm the current Salesforce user can manage apps in Setup.
The issue-panel lookup says No matching records found
Start with a short, real text fragment from the target object's key searchable fields. For Cases, that is often Case Number or Subject. For Accounts and Contacts, use Name, Email, Phone, Website, or another field the object exposes as searchable in the bridge.
You can also paste the direct Salesforce 15- or 18-character record ID to link it explicitly.
Status sync did not move the Salesforce record to the expected state
Confirm that status sync is enabled, that the selected Salesforce object exposes a usable status-like field, and that the integration user can update that field.
For Cases, remember that closed-state handling follows supported Case lifecycle logic rather than a raw generic status patch.
Attachment or comment sync is incomplete
Confirm the Smart Connected Item has the relevant sync option enabled and that the Run As user can access comments, feed items, feed comments, and Salesforce Files for the selected object.
The issue-panel Refresh action is the fastest way to force an immediate inbound pull while you validate the setup.
Known Limits
Current product limits and behavior boundaries
10 MB attachment ceiling
Files above 10 MB are skipped to stay inside Forge runtime and payload boundaries.
Reply flattening
Salesforce feed replies are flattened into Jira comments rather than preserved as threaded replies.
No delete mirroring
Deleted comments or deleted attachments are not automatically removed from the opposite system later.
Auto-managed links stay protected
Scheduler-created links are intentionally read-only in the issue panel.
Status sync depends on object metadata
If the selected Salesforce object does not expose a usable status-like field, status sync should remain disabled.
Custom object availability depends on org metadata and access
Custom objects only appear when the connected Salesforce org returns them through describe metadata and the integration user can see them.
References
Official references
Salesforce: invoke REST APIs with the integration user and OAuth client credentials
Salesforce Developer Edition signup
Salesforce REST API developer guide
Salesforce object reference: Case
Salesforce object reference: FeedItem
Salesforce object reference: FeedComment
Salesforce object reference: ContentVersion
Atlassian Forge documentation