The scheduled trigger pulls new and updated ServiceNow data into Jira on a five-minute cadence.
Documentation validated against bridge build on April 13, 2026
Technical deployment guide for the ServiceNow Bridge for Jira
This guide covers Marketplace installation, ServiceNow authentication, Smart Connected Items, sync behavior, and issue-panel operations for enterprise Jira environments.
Marketplace app
Forge app
Jira admin page
Jira issue panel
ServiceNow Table API
Jira issue, comment, and attachment events push eligible changes back to ServiceNow.
Files above 10 MB are skipped to stay inside Forge runtime and payload limits.
The admin experience exposes the most common ticket-like ServiceNow tables used in Jira integration scenarios.
Fast Path
Quick start in six steps
Install the app
A Jira site admin installs the app from Atlassian Marketplace and opens the ServiceNow Bridge admin page from Jira administration.
Choose the authentication method
Gather the ServiceNow instance URL and decide whether the connector will use OAuth 2.0 Client Credentials or Basic Authentication. OAuth is the recommended option for new installs.
Save the ServiceNow connection
Enter the instance URL, select the authentication mode, then provide either username/password or OAuth client ID/client secret. Secrets are stored securely in Forge secret storage.
Create Smart Connected Items
Choose display-only, one-way sync, or two-way sync behavior, then set Jira scope, ServiceNow source, field mappings, and optional sync features.
Link records or enable auto-create
Jira users can manually link ServiceNow records from the issue panel, and synchronized items can optionally auto-create Jira issues from new ServiceNow records.
Monitor sync results
Use the issue panel, the latest sync status in admin, and the ServiceNow work notes added by the connector to confirm the relationship and sync state.
Architecture
How the connector works
Current sync model in this build
The scheduled trigger runs every five minutes. It can create Jira issues for new ServiceNow records when auto-create is enabled, apply ServiceNow-to-Jira updates for fields, status, comments, and attachments, and recheck two-way status alignment so a delayed Jira issue event does not leave records out of sync.
Jira-to-ServiceNow updates are event-driven. Jira issue updates push field and status
changes, Jira comment events push Jira comments to the ServiceNow comments
field, and Jira attachment events push new files to ServiceNow.
Where configuration and state live
- ServiceNow connection settings are stored in Forge app storage.
- ServiceNow passwords and OAuth client secrets are stored in Forge secret storage.
- OAuth access tokens are cached in Forge secret storage and refreshed automatically.
- Smart Connected Item definitions and issue-to-record links are stored in Forge app storage.
- Comment and attachment pairing state is stored per linked issue/record pair.
- Paid and trial installs are license-gated, while development installs can be used for testing.
How Jira users see the integration
- The issue panel shows one card per Smart Connected Item that applies to the Jira project.
- Display-only items wait for a manual link before showing ServiceNow fields.
- Synchronized items can either be manually linked or auto-managed by the scheduler.
- Linked records can expose field previews, a direct ServiceNow link, refresh, and unlink actions.
How comments are modeled
- Jira comments are pushed to the ServiceNow
commentsfield as public comments. - ServiceNow
work_notesare pulled into Jira as comments prefixed with[ServiceNow work note]. - Connector-generated link notes are written to
work_notes, not public comments. - Journal entries are append-only, so the connector creates new entries instead of editing old ones in place.
How status sync behaves
- The admin chooses one ServiceNow status field per synchronized item.
- The connector maps Jira workflow states to the closest safe ServiceNow option instead of requiring exact parity.
- In one-way and two-way modes, status sync still works in both directions and the most recent side wins.
- For Incident-like records, the connector can also fill close code and close notes when ServiceNow requires them on resolution.
Object Catalog
Supported ServiceNow tables in this connector
| Module / object group | Tables exposed by the connector | Notes |
|---|---|---|
| ServiceNow ITSM | Incidents, Problems, Change Requests, Catalog Tasks | These are the primary ticket-like tables for display-only, one-way, and two-way flows. |
| ServiceNow Customer Service | Cases |
Uses sn_customerservice_case. The underlying table must exist on the
connected instance; some tenants do not expose it.
|
| ServiceNow Platform | Tasks | Useful when Jira issues need to reference a more generic ServiceNow task record. |
What admins should expect
The catalog is intentionally curated rather than completely open-ended. It keeps the admin experience predictable while still covering the most common ServiceNow tables used for Jira issue linking and synchronization.
Terminology
Key terms used in this guide
Display-only Smart Connected Item
A manual mapping that lets Jira users link a ServiceNow record in the issue panel and view selected fields. It does not auto-create Jira issues or run scheduled field synchronization.
Synchronized Smart Connected Item
A one-project, one-issue-type mapping that can create Jira issues from ServiceNow and keep mapped fields aligned in one direction or both directions.
Auto-managed link
A record link created by the scheduler when auto-create is enabled. Auto-managed records are read-only in the issue panel and can be refreshed but not manually unlinked there.
ServiceNow status field
A field detected from ServiceNow metadata that behaves like a record state or status. Status sync relies on one of these fields when the chosen table exposes one.
Connector-managed work note
A ServiceNow internal note added by the connector to record link traceability or required resolution metadata without exposing the information as a public comment.
Manual refresh
The issue-panel action that forces an immediate pull from the linked ServiceNow record instead of waiting for the next five-minute scheduled run.
Admin Setup
Install from Atlassian Marketplace
Install the app on the Jira Cloud site
Install the ServiceNow Bridge from Atlassian Marketplace using a Jira site admin account. After installation, open Jira administration and locate the app under the Marketplace apps area.
Confirm the license state
Paid and trial environments must have an active Marketplace license. If the license is missing or expired, both the admin page and the issue panel will show a license-required message and block normal usage. Development installs remain usable for testing.
Open the app before creating mappings
The connector cannot create Smart Connected Items until the ServiceNow connection is saved successfully, so prepare the instance authentication details before building any Jira mappings.
ServiceNow
Prepare the ServiceNow instance
Authentication inputs the admin page accepts
- Instance URL: for example
https://your-instance.service-now.com. - Authentication mode: OAuth 2.0 Client Credentials or Basic Authentication.
- Basic Authentication: username and password for a ServiceNow user that can read and update the target tables.
- OAuth 2.0 Client Credentials: client ID and client secret from a ServiceNow OAuth Application Registry record.
- After a successful save, the app shows either the resolved Connected user or the OAuth Connected principal.
Instance readiness checklist
- Confirm the target tables exist on the instance.
- Confirm the ServiceNow identity can access the Table API and Attachment API for those tables.
- If using OAuth, create the system property
glide.oauth.inbound.client.credential.grant_type.enabledand set it totrue. - If using OAuth, create an Application Registry record with Create an OAuth API endpoint for external clients and set the OAuth Application User.
- If using OAuth, either keep the token scope unrestricted for this integration or explicitly configure auth scopes and REST API access policies for the APIs the app calls.
- If using OAuth, confirm the selected OAuth Application User can read metadata tables such as
sys_choiceandsys_dictionaryas well as the target business tables. - Decide which module / object group and table each Jira project should use.
- Check whether Customer Service Cases are available before planning a case-based flow.
Basic Authentication preparation
- Create or select a dedicated ServiceNow integration user.
- Make sure the user can read table metadata, target records, comments, and attachments.
- Use this mode only when the customer cannot move to OAuth yet.
OAuth 2.0 preparation
- Navigate to System OAuth > Application Registry and create a client for external clients.
- Copy the generated Client ID and reveal or generate the Client Secret.
- Add the OAuth Application User field to the form and select the ServiceNow user the client should act as.
- For first-time testing, use a fully privileged admin user and a relaxed scope restriction to confirm the connector works before tightening the policy.
Recommended starting point
For new installations, start with OAuth 2.0 Client Credentials. Basic Authentication remains available as a legacy option, but OAuth avoids storing a human user password in the Jira admin form and more closely matches enterprise integration policy expectations.
Developer instances are supported
A ServiceNow personal developer instance can be used with this connector. If auto-create or lookup does not work, the usual causes are table availability, field policy requirements, mappings, or scheduler timing, not the fact that the instance is a developer tenant.
Jira Admin
Authenticate in the Jira admin page
Connection form fields
- ServiceNow instance URL: full HTTPS origin for the target tenant.
- Authentication mode: choose OAuth 2.0 Client Credentials or Basic Authentication.
- Basic Authentication fields: ServiceNow username and ServiceNow password.
- OAuth fields: ServiceNow OAuth client ID and ServiceNow OAuth client secret.
- Save connection: validates the selected authentication method before the app accepts it.
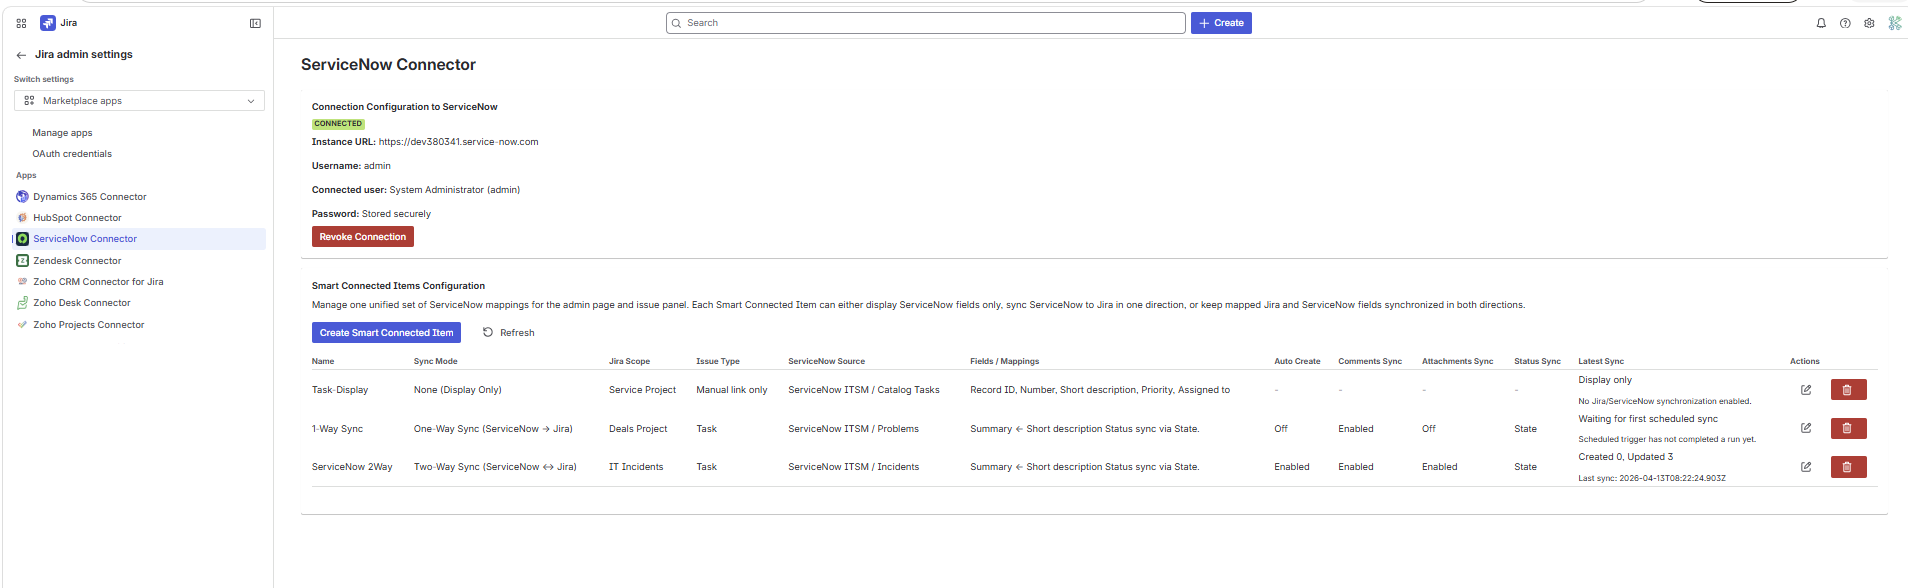
Connected-state summary
- Connection Configuration to ServiceNow heading.
- Connected lozenge.
- Authentication mode is shown after the connection is saved.
- Basic mode shows Instance URL, Username, Connected user, and a stored-securely password indicator.
- OAuth mode shows Instance URL, Client ID, Connected principal, and a stored-securely client secret indicator.
- Revoke Connection button to disconnect the instance.
Basic Authentication steps
- In ServiceNow, confirm the chosen integration user can read metadata, target records, comments, and attachments through the ServiceNow APIs.
- Open the ServiceNow Bridge admin page in Jira administration.
- Enter the ServiceNow instance URL.
- Select Basic Authentication (Legacy) as the authentication mode.
- Enter the ServiceNow username.
- Enter the ServiceNow password.
- Click Save connection.
- Confirm the app shows the resolved connected user and marks the connection as connected.
OAuth 2.0 Client Credentials steps
- In ServiceNow, open
sys_properties.listor System Properties > All Properties and createglide.oauth.inbound.client.credential.grant_type.enabledwith valuetrue. - Open System OAuth > Application Registry, click New, then choose Create an OAuth API endpoint for external clients.
- Enter a name for the client, keep it active, and let ServiceNow generate or reveal the Client Secret.
- Open the record menu, choose Configure > Form Design, add the OAuth Application User field, then select the ServiceNow user the client should act as.
- For first-time testing, use an OAuth Application User with full API access and a relaxed token scope restriction. If the customer later enables secure scoping, they must explicitly allow the APIs used by the connector.
- Copy the Client ID and Client Secret from the ServiceNow client record.
- In Jira, enter the ServiceNow instance URL.
- Select OAuth 2.0 Client Credentials as the authentication mode.
- Enter the ServiceNow OAuth client ID and client secret, then click Save connection.
- Confirm the app shows the connected principal and marks the connection as connected.
Validation behavior
The connector rejects empty or invalid credentials and surfaces ServiceNow API errors back through the admin page. OAuth setup problems usually appear as token or policy errors such as client-credentials access being disabled, unscoped API access being blocked, or insufficient rights on metadata tables. If the connection succeeds but a later table action fails, the issue is more likely a table policy or metadata problem than an authentication failure.
OAuth policy notes
The connector uses standard ServiceNow Table API endpoints such as
/api/now/table/sys_db_object, sys_choice, and
sys_dictionary. If the OAuth client uses a secure scope restriction, the
customer must explicitly allow those APIs through ServiceNow auth scopes and REST API
access policies. For first-time setup, a relaxed token restriction is the easiest way
to verify the integration before tightening the policy.
Core Configuration
Create Smart Connected Items
Smart Connected Items are the core configuration objects for this connector. The admin dashboard shows the configured items, their sync mode, Jira scope, ServiceNow source, enabled options, latest sync status, and available row actions.
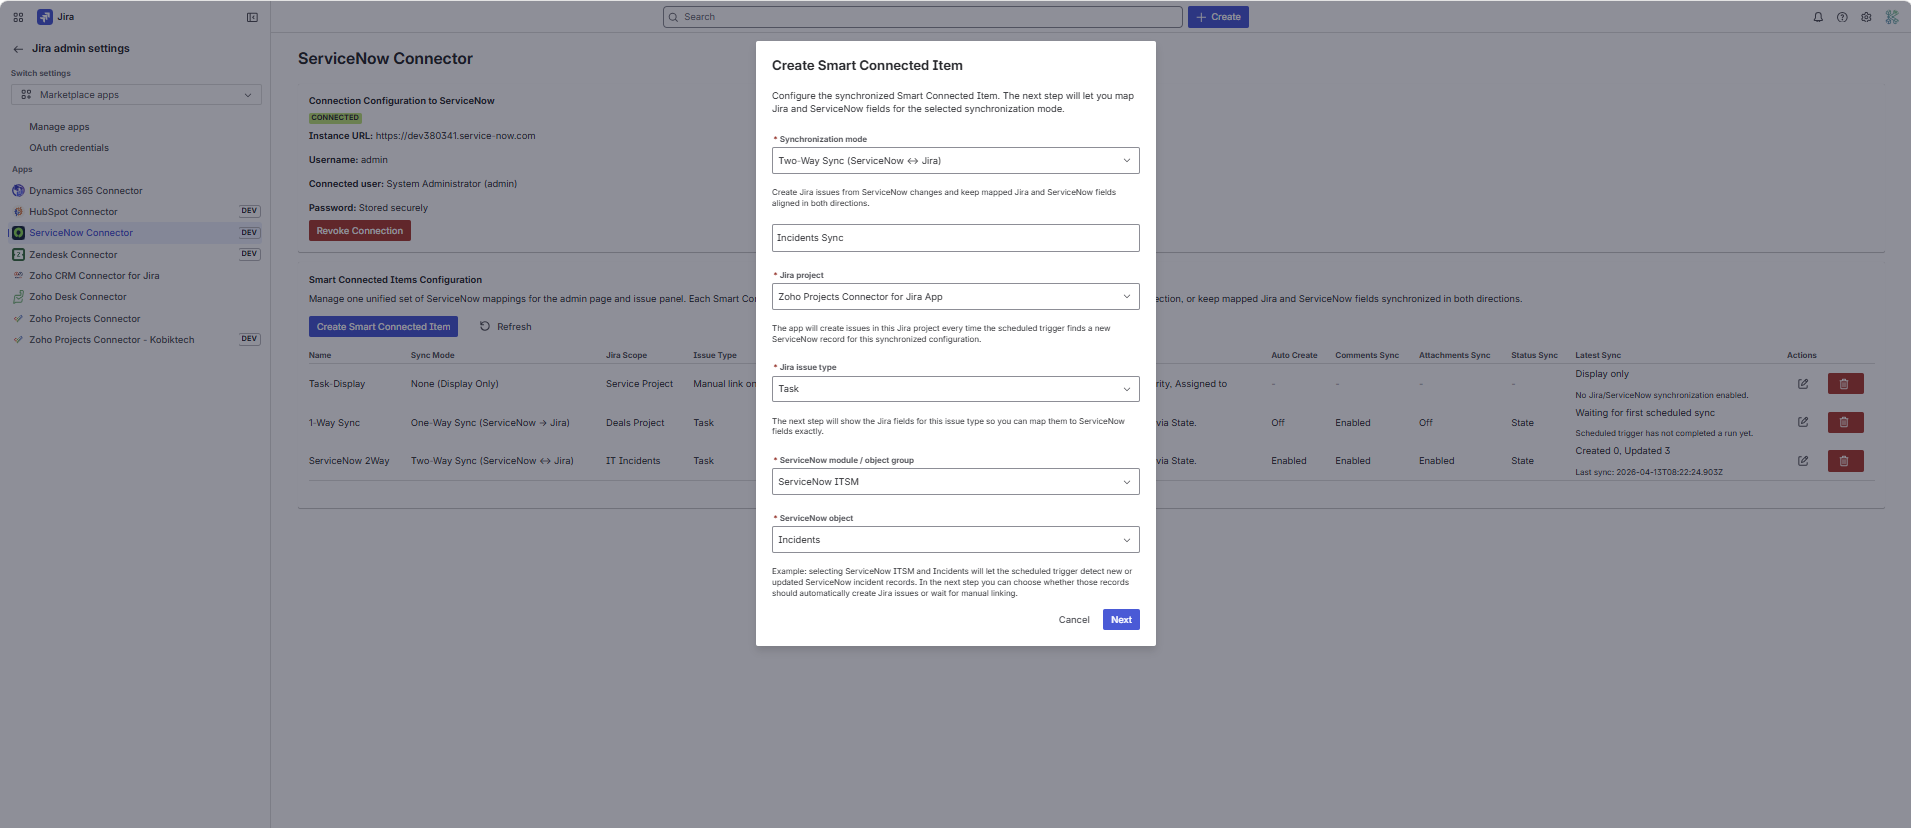
Entry point
From the dashboard, admins use Create Smart Connected Item and first choose the synchronization mode. The modal then switches into the correct flow for either display-only or synchronized setup.

Display-only Mode
Configure display-only Smart Connected Items
Choose the None mode
This flow is used when the issue panel should only display selected ServiceNow fields for a record after a Jira user manually links it.
Set the display name and Jira projects
Display-only items can target multiple Jira projects. The admin chooses every project that should use the same ServiceNow object and field preview.
Select the ServiceNow module / object group and object
The table list is loaded from the curated ServiceNow module catalog. Once the table is chosen, the field selector loads live ServiceNow field metadata.
Choose the fields to display in the issue panel
The admin selects one or more ServiceNow fields. Jira users will see those values in the issue panel after they link a record.
Synchronized Modes
Configure one-way and two-way Smart Connected Items
Step 1: choose the basics
- Synchronization mode.
- Smart Connected Item name.
- Target Jira project.
- Target Jira issue type.
- ServiceNow module / object group.
- ServiceNow table.
Step 2: choose sync behavior
- Auto-create Jira issues from new ServiceNow records.
- Field mappings between Jira and ServiceNow.
- Status sync.
- Comments sync.
- Attachments sync.
What the mode names mean in the UI
One-Way Sync (ServiceNow -> Jira) keeps ServiceNow as the source of truth for mapped fields. Two-Way Sync (ServiceNow <-> Jira) keeps mapped fields aligned in both directions.
Save-time validation
The app blocks save when required Jira fields are still unmapped, when a Jira field is mapped more than once, or when selected Jira field types are not yet safe for the scheduled sync to transform.
Behavior Matrix
Sync options matrix
| Option | What it does | Important details |
|---|---|---|
| Auto Create | Creates Jira issues from new ServiceNow records detected by the scheduler. | Only available for synchronized items. The run happens on the five-minute scheduler, not instantly. |
| Field mappings | Defines how ServiceNow fields populate Jira issue fields, or which fields stay aligned both ways in two-way mode. | Each Jira field can only be mapped once. |
| Status sync | Aligns Jira workflow status with a selected ServiceNow status field. | Even when the Smart Connected Item is one-way, status sync still behaves bidirectionally and the newest side wins. Incident-like records can also receive connector-generated close code and close notes when needed. |
| Comments sync | Mirrors ServiceNow comments and work notes into Jira and pushes Jira comments back to ServiceNow. |
Jira comments are pushed to ServiceNow public comments. Imported ServiceNow work
notes are prefixed with [ServiceNow work note] in Jira. Deletions
are not removed automatically.
|
| Attachments sync | Reconciles unmatched Jira and ServiceNow attachments during scheduled sync, manual linking, and manual refresh. | Jira attachment events push new files quickly. Files over 10 MB are skipped and deletions are not mirrored automatically. |
Permissions
Permissions and access reference
Forge scopes in the manifest
storage:appread:jira-workwrite:jira-workread:jira-userread:issue:jirawrite:issue:jira
ServiceNow API access used by the connector
- Outbound HTTPS access to
https://*.service-now.com. - Table API access for the supported tables.
- Attachment API access for file upload and download.
- Journal table access for comment and work note discovery.
Least-privilege planning
The connector only uses Jira read/write scopes plus app storage, and its ServiceNow network egress is restricted to ServiceNow domains. On the ServiceNow side, the connected account should have access to exactly the tables and operations that the chosen Smart Connected Items need.
Jira User Guide
Issue panel overview
Before the app is usable
The issue panel can show License required, ServiceNow connection not configured, or No Smart Connected Items for this project depending on the current admin setup state.
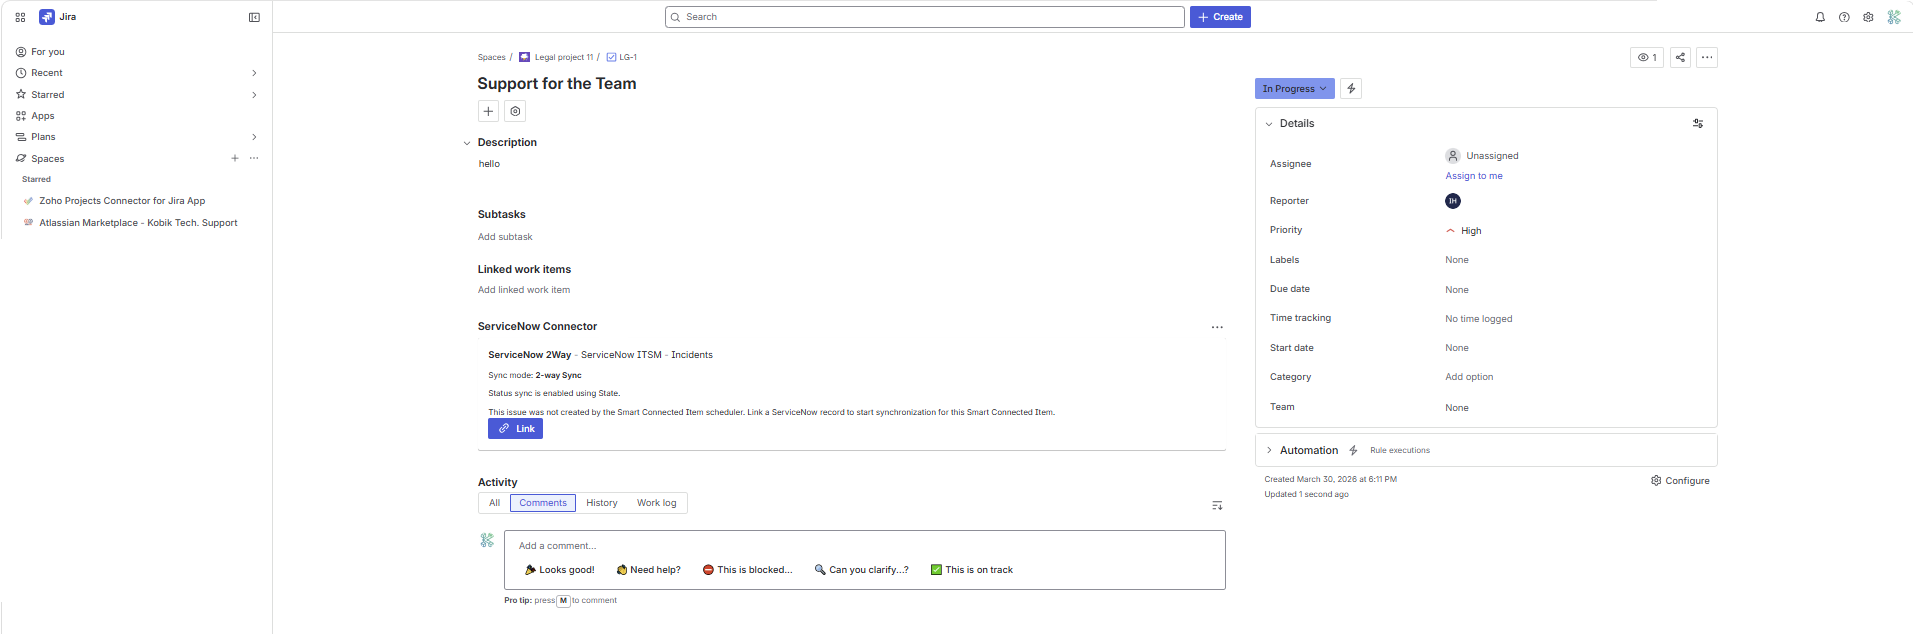
What a Smart Connected Item card shows
Each card shows the Smart Connected Item name, ServiceNow module, ServiceNow table, sync mode, a status-sync indicator when relevant, and either a linked record preview table or a link button when no record is linked yet.
What appears for linked records
When a record is linked, the card shows the linked record ID, a preview table of the selected or mapped fields, an Open in ServiceNow action, a Refresh action, and an Unlink action when the link is manually managed.

Manual Flow
Link, refresh, and unlink
Click Link on the issue-panel card
The modal title is Link a ServiceNow record. It prompts the user to search within the selected ServiceNow module and table.
Search by number, short description, or sys_id
The modal includes a field labeled
Search by number, short description, or sys_id with the
placeholder Start typing to search ServiceNow records. Matching
records appear as selectable results.
Use Refresh for an immediate pull
Refresh pulls ServiceNow data into Jira right away instead of waiting for the next five-minute scheduled run. This is useful after editing the record in ServiceNow.
Use Unlink only on manual links
The Unlink action appears only for manually managed links. Auto-managed links created by the scheduler stay read-only in the issue panel.
Scheduled Flow
Auto-managed links created by the scheduler
How the issue panel describes auto-managed records
When a Jira issue was linked automatically by a synchronized Smart Connected Item, the issue panel explains that the linked ServiceNow record is read-only there and can still be refreshed without waiting for the next scheduled run.
When auto-managed links happen
- Only synchronized Smart Connected Items can auto-create Jira issues.
- The auto-create checkbox must be enabled.
- The selected Jira issue type must have enough supported mappings to create issues safely.
- The record must be new or updated within the scheduler's detection window.
What users can still do
- Open the linked ServiceNow record.
- Refresh the preview.
- Review mapped field values and status information.
- See comment, work note, and attachment effects as they sync over time.
ServiceNow Effects
What changes in ServiceNow after linking
Field updates
One-way mode applies ServiceNow changes to Jira. Two-way mode also allows Jira issue updates to flow back to the linked ServiceNow record for mapped fields.
Status changes
When status sync is enabled, Jira transitions and ServiceNow status changes can update each other using the chosen ServiceNow status field.
Comments and work notes
Jira comments are pushed to ServiceNow public comments. ServiceNow work notes are
brought into Jira as comments marked with a [ServiceNow work note]
prefix so users can tell they were internal notes in ServiceNow.
Attachments
Files are synchronized through the ServiceNow Attachment API. The connector keeps attachment pairing state so already-synced files are not duplicated on later runs.
Link traceability
After a manual or automatic link is established, the connector writes an internal ServiceNow work note containing the Jira project, issue key, issue ID, issue URL, sync mode, link source, and timestamp.
Done-state resolution support
For Incident-style records that require resolution metadata on close, the connector can populate close code and close notes automatically when the linked Jira issue moves to a done state.
Traceability
Connector-managed notes and note markers
| Entry type | Marker text | Purpose |
|---|---|---|
| ServiceNow link work note | [ServiceNow Connector] Jira link established |
Marks the relationship between a ServiceNow record and a Jira issue and captures the Jira project, issue key, issue ID, issue URL, sync mode, and link source. |
| Imported ServiceNow work note in Jira | [ServiceNow work note] |
Distinguishes internal ServiceNow work notes from normal Jira comments after work notes are mirrored into Jira. |
| Connector-generated close note | [ServiceNow Connector] Linked Jira issue <KEY> moved to Done... |
Provides required close note evidence when a ServiceNow Incident-like record is resolved from the Jira side. |
Operations
Troubleshooting
The connection cannot be saved
Confirm the instance URL is the tenant origin and the selected authentication
method is configured correctly. For Basic Authentication, verify the username and
password. For OAuth, verify that client credentials are correct, client
credentials are enabled through the
glide.oauth.inbound.client.credential.grant_type.enabled property,
the OAuth client has an OAuth Application User, and the
Application Registry scope policy allows the APIs the connector calls. If the
connection saves but later actions fail, the issue is more likely a table policy
or metadata problem than an authentication failure.
The OAuth connection saves, but creating a Connected Item fails
This usually means the OAuth Application User can authenticate but does not have
enough rights to read metadata tables such as sys_choice or
sys_dictionary. The app reads those tables to build the field picker
and status options during Smart Connected Item creation. Confirm the OAuth
Application User has read access to those metadata tables and to the target
business tables.
Cases or another table do not work on this instance
Verify that the underlying ServiceNow table exists on the tenant. The connector
includes a curated catalog entry for Cases, but the sn_customerservice_case
table still has to be available on the connected instance.
Auto-create is enabled but Jira issues are not being created
Check the latest sync timestamp, confirm the ServiceNow record is newer than the scheduler cursor, and verify that the chosen Jira issue type does not still require unmapped or unsupported fields. The scheduler runs every five minutes, so issue creation is never instant.
Status sync did not move the ServiceNow record to Done or Resolved
Confirm that status sync is enabled, that the Smart Connected Item points to the correct ServiceNow status field, and that the ServiceNow table's policy does not require extra fields. For Incident-like records, this build can automatically add close code and close notes when Jira moves to a done status.
Comments, work notes, or attachments are not syncing
Confirm that the corresponding sync checkbox is enabled on the Smart Connected Item, that the ServiceNow account has API access for those operations, and that the file size is within the 10 MB connector limit for attachments.
Files or comments were deleted on one side but still appear on the other
This is expected in the current build. Comment deletions and attachment deletions are not removed automatically by the connector after they have already synced.
Known Limits
Current limitations and operational notes
Functional limits
- Display-only Smart Connected Items do not run scheduled synchronization.
- Attachment sync skips files over 10 MB.
- Status sync requires a detectable ServiceNow status field.
- Comment and attachment deletions are not mirrored automatically.
Operational limits
- Auto-create is only available for synchronized items.
- Table and field availability depends on ServiceNow tenant metadata and access.
- Outside development installs, an active Marketplace license is required.
- Auto-managed issue-panel links are intentionally read-only.
Public vs internal note behavior
Jira comments do not expose a native public-vs-internal toggle that maps cleanly to ServiceNow journal behavior. This connector therefore sends Jira comments to ServiceNow public comments, while internal link evidence stays in ServiceNow work notes under connector-managed markers.
References